

I’m assuming you have already heard about Remix, a full-stack web framework and you are trying it out and probably decided on using Supabase as a Firebase alternative … but wondering how to integrate it with Remix. If so, you are in the right place!
This blog aims to show you how to set up Supabase on your local machine and does not focus on using the cloud Supabase version - all you need is to setup env variables in the Remix app and get going.
To sum up what will be covered in this blog:
- Setting up Supabase locally
- Securing the Setup
- Creating a custom table in Superset including how to link tables
- How to create an RLS policy in brief
- Setup env variables
- Generating types to use the Database in the Remix App
- Setting up the Supabase Server and Browser Clients in the Remix App
- Calling a Supase API through the instantiated clients
What is Supabase?
 Supabase is built on top of PostgreSQL and uses a relational database, unlike Firebase which is NoSQL. Supabase provides a range of tools and services for developers required for the backend, such as creating and managing databases, data migrations, storing static assets through “Buckets”, a real-time database, a serverless platform, user authentication including mailing features, app analytics and a lot more. It is very easy to setup and has integration support for a lot of frameworks such as JS React, NextJS, Remix, Flutter, Angular, Vue, Ionic, Svelte, etc.
Supabase is great for real-time chat apps and it is superior to firebase in terms of having good tools for search and performing queries based on a specific keyword. - Reed Barger
Pre - Requisites
Docker
Git
Node
NPM
Supabase Local Setup
There are 2 ways to setup Supabase locally.
🔵 Cloning the repository and using docker-compose up command
🔵 Using the Supabase CLI
1. Cloning the Repository
Clone the Supabase repository with the following command:
git clone --depth 1 https://github.com/supabase/supabase
However, the entire source code isn't necessary. The docker folder will be sufficient for our scenario.
Next, rename the example .env.example file to .env
This blog sets keys in .env files to simplify the process of setup and for local use it is fine but for production use, you should use a secure method for managing your application secrets to ensure the security of your project.
Securing the Setup
In the .env file default values for ANON_KEY and SERVICE_ROLE_KEY have been provided.
From the Supabase Documentation:
anon key: This key is used to bypass the Supabase API gateway and can be used in your client-side code. service role key: This key has super admin rights and can bypass your Row Level Security. Do not put it in your client-side code. Keep it private.
Let’s replace the default values with the help of Supabase’s API key generator.
First, generate a random password (At least 32 chars long and avoid symbols) for updating the POSTGRES_PASSWORD variable in the .env file. You can use an online password generator like LastPass.
Next go to:
https://supabase.com/docs/guides/self-hosting#api-keys
JWT Secret will be auto-generated by the tool and you can use this JWT Secret value to update the JWT_SECRET variable in the env file. Once you update it go back to the API key generator and select ANON_KEY in the Preconfigured Paylod dropdown:

Copy the value in the Generated Token field and update the ANON_KEY variable in the .env file. Next select SERVICE_KEY from the Preconfigured Payload dropdown and update the SERVICE_ROLE_KEY with the newly generated token.

We will need the ANON_KEY and SUPABASE_PUBLIC_URL later.
Finally, update the anon and service_role keys in the volumes/api/kong.yml file.
Now, let’s run:
docker-compose up -d
After the containers are up you can access the Supabase Dashboard on port 3000. You can change the port from the .env file. (STUDIO_PORT)
Using the Supabase CLI
You can also use the Supabase CLI to develop your project locally. Go to https://supabase.com/docs/guides/cli
and then install the CLI through npm or the OS specific to your device.
Next, simply do a
supabase initand then a
supabase start

You can access the Supabase Dashboard by going to the Studio URL.

Remix Setup
Run the following command to get started with a Remix App:
npx create-remix@latest login-tutorial
You will be prompted with some preference selections, I recommend going ahead with “Just the basics” for the “which type of app do you want to create to keep the code simple” prompt for the sake of simplicity to follow this blog, and note that we will be using typescript.
Remember that I said we will need the ANON_KEY and SUPABASE_PUBLIC_URL later? Let’s use them now.
Create a .env file and add the SUPABASE_ANON_KEY and SUPABASE_URL variables and use the ANON_KEY and SUPABASE_PUBLIC_URL values respectively.

Supabase provides a helper library for remix, let’s install it with the following command:
npm install @supabase/auth-helpers-remix
Now run:
npm run dev
Let’s get the types for our custom tables as we are using typescript. Headover to:
https://supabase.com/docs/guides/cli
and install the supabase cli. You might have already done this if you setup Supabase with the cli before.
First let’s create an example table under the public schema.
Go to the Supabase Dashboard > Table Editor OR Database > New table

Let’s create a table to store the user details. Supabase already has a users table under auth schema and I want to link the user ids from that table to this (as a foreign key). To achieve this, click on the link icon I’ve highlighted in blue in the above picture, then configure the fields to have the following:

Make sure the data types are added for each field and press Save.
You can setup RLS policies for a table to ensure more security. To configure RLS policies you can head over to Authentication → Policies → New Policy (For your preferred table). You can easily set them up with the templates Supabase has provided. For example:
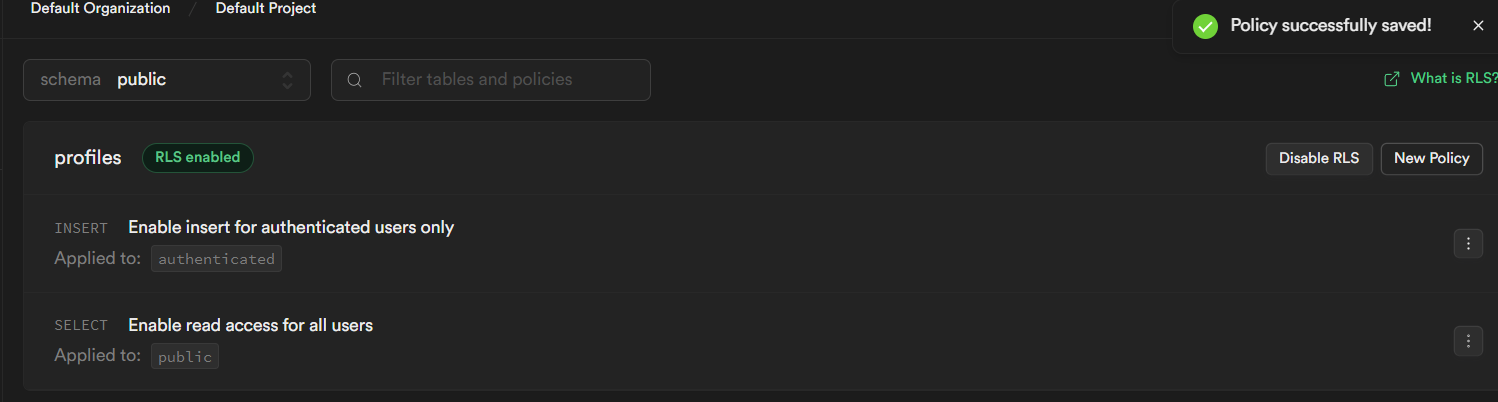
In this example, we can simply query the users table in our app but to add new user details, the logged in user has to be authenticated.
Generating types for Typescript
Go to wherever you want to define your types in your source code, for example go to the app directory and run the following command (Replace with your values for the tagged variables):
Format of command:
supabase gen types typescript --db-url postgres://<user>:<yourpasswordhere>@<host>:<port>/<postgresdb> flytb > db_types.tsSome example values:
<user> - postgres
<password> - the POSTGRES_PASSWORD you set in .env file
<host> - 192.168.1.8 (Your IP Address)
<postgresdb> - postgres
flytb > db_types.ts means the name of the file, you can give it any name you want.
Once you are done generating types you should see something similar to the following:
export type Json =
  | string
  | number
  | boolean
  | null
  | { [key: string]: Json }
  | Json[]

export interface Database {
  public: {
    Tables: {
      profiles: {
        Row: {
          bio: string | null
          created_at: string | null
          dob: string | null
          full_name: string | null
          id: string
        }
        Insert: {
          bio?: string | null
          created_at?: string | null
          dob?: string | null
          full_name?: string | null
          id: string
        }
        Update: {
          bio?: string | null
          created_at?: string | null
          dob?: string | null
          full_name?: string | null
          id?: string
        }
      }
    }
    Views: {
      [_ in never]: never
    }
    Functions: {
      [_ in never]: never
    }
    Enums: {
      [_ in never]: never
    }
    CompositeTypes: {
      [_ in never]: never
    }
  }
}
Setting up a Common Supabase Server Client
Create a file called supabase.server.ts inside the app directory as follows:
import { createServerClient as _createServerClient } from "@supabase/auth-helpers-remix";

import type { Database } from "./db_types";

export const createServerClient = ({
  request,
  response,
}: {
  request: Request;
  response: Response;
}) =>
  _createServerClient<Database>(
    process.env.SUPABASE_URL!,
    process.env.SUPABASE_ANON_KEY!,
    { request, response }
  );
We are setting the database types we created and the env variables here. We have to pass the request and response in order for the Supabase client to access the session cookie (which contains the session token) that is being stored in the request headers. We can now use our createServerClient to make authenticated requests to the Supabase server.
You can use the Supabase APIs from the remix server side, for example, inside Remix loaders or actions with this client. Just as an example:
import type { LoaderArgs } from "@remix-run/node";
import { json } from "@remix-run/node";
import { Form } from "@remix-run/react";
import { createServerClient } from "~/supabase.server";

export const loader = async ({ request }: LoaderArgs) => {

  const response = new Response()
  const supabaseClient = createServerClient(
    { request, response }
  )

  const {data: {session}} = await supabaseClient.auth.getSession();

	// to set cookie headers and access data on the client side such as session
return json({session}, {headers: response.headers})Both of these are functions, which are only available at the server-side. A loader can be used to provide data to the route before the page is rendered so it can be used for GET type of API requests, access env variables directly, etc. An action API is similar to a loader API, the difference is for data mutation you use actions, such as POST, PUT, PATCH, DELETE.
Using Supabase Browser Client
You can also use an authenticated Supabase client from the browser side, by doing the following.
First, you have to pass the env data with the help of a loader to the client side because in Remix you can’t directly access the way we do in normal React Apps:
export const loader = async ({ request }: LoaderArgs) => {
  const env = {
    SUPABASE_URL: process.env.SUPABASE_URL!,
    SUPABASE_ANON_KEY: process.env.SUPABASE_ANON_KEY!,
  };

  const response = new Response();
  const supabase = createServerClient({ request, response });

  return json({ env });
};
Now let’s access the env variables from the browser (client) side by using the useLoaderData hook provided by remix and try calling a Supabase API:
export default function Example(){
	const { env } = useLoaderData<typeof loader>();

	// import createBrowserClient from @supabase/auth-helpers-remix
	const [supabase] = useState(() =>
    createBrowserClient<Database>(env.SUPABASE_URL, env.SUPABASE_ANON_KEY)
  );

	useEffect(() => {
	      supabase
	        .from("profiles") // we are querying the profiles table we created before
	        .select()
	        .then((response) => {
	          if (response.data) {
	            // do something with the data
	          }
	        });
	  }, [supabase]);
}
And that’s all, folks! We have covered the basics of getting Supabase setup locally and integrating it to Remix. If you have questions or need help on using Remix or Supabase in your project do reach out to us here and we can have a conversation.